
Learn how to invoice sales prepayments in your Dynamics 365 Business Central solution.

In Business Central, prepayments are payments that are invoiced and posted to a sales or purchase order before you post the final invoice. You can use the prepayments capabilities to invoice and collect deposits from customers, and to remit deposits to vendors.
You can generate prepayment invoices from sales and purchase orders, with prepayment amounts based on your setup and these amounts can be adjusted as needed on the document. You have the option to specify a total prepayment for the entire order or distribute the prepayment across individual order lines. If additional items are added or quantities are changed after the initial prepayment, you can issue additional prepayment invoices as needed. This flexibility allows you to post updated prepayment invoices when modifications are made to the order.
Pleate note: If you want to delete a line for which a prepayment has already been invoice, you must issue a prepayment credit memo before you can delete the line.
Prior to posting a prepayment invoice, you will need to enter a vendor Invoice No. on the purchase document.
You can set prepayment percentages on the item card (per vendor per item no.):
Open the item card, select Related > Purchases > Prepayment Percentages

Here you can set the required prepayment percentage by vendor:

Alternatively, you can set the prepayment percentage on the purchase order. The very bottom fasttab “Prepayment” is where the percentage can be set based on the entire purchase order amount.

Please note that you can also personalize your screen and add the prepayment % and amount to your lines. This allows you to specifically set the prepayments percentages on each line.

To invoice the prepayments, once set on your document, you will select Actions > Posting > Prepayment > Post Prepayment Invoice
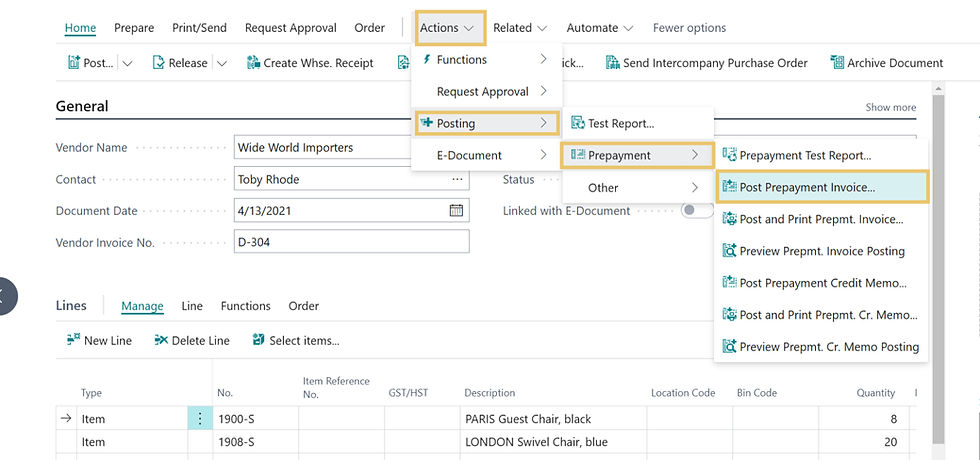
Note that there are several options for generating a prepayment invoice such as Prepayment Test Report that can be used to view the prepayment, providing all details.

You can also choose to post and print and preview the prepayment invoice posting to confirm entries.

Here is an example of a prepayment invoice:

Note: Once a prepayment invoice has been posted, you will need to create a credit if any changes are required.
To view a prepayment invoice, select Order > Prepayment Invoices

You can also view the prepayment invoice on the vendor card; the description shows it is a prepayment and references the purchase order number it was generated from.

You will also notice that on the original document, the status shows “Pending Prepayment”

Generate payment
As with regular vendor payments, you will select the prepayment invoice to be paid.

When you view the Posted Prepayment Invoice on the purchase document, you will see a remaining amount of zero.

Continue with the receive and invoice of the purchase document when ready. To do this, the vendor invoice number needs to be adjusted so the prepayment invoice does not match causing a conflict. So, for example adding a “-1” to the vendor invoice number.
The final purchase invoice will present as per below, itemizing out the Vendor prepayment and posting the balance.

Explore Our Library of Business Central Training Videos on Youtube
If you're looking to learn more about Business Central, subscribe to our YouTube channel for more step-by-step training videos, and stay connected with us on LinkedIn, Facebook, and Instagram for the latest updates.