How to Integrate Power BI Reports in D365 Business Central
- Kwixand Team
- Nov 19, 2024
- 4 min read
Learn how to integrate Power BI reports in Dynamics 365 Business Central to streamline your reporting.

In this training blog post, we'll walk you through the process of integrating and viewing Power BI reports within Business Central. Whether you're new to Business Central or looking to streamline your reporting capabilities, Power BI integration offers powerful data visualization tools right within your system.
Display Power BI Reports on the Role Center Homepage
To begin, head to the Role Center homepage and scroll down to locate the Power BI Report section. If no report is currently displayed, you’ll see an empty space.

Click on the dropdown arrow to view a list of available Power BI reports. Choose a report from the list by clicking Select Report.

Click the ellipsis next to the report and select Enable and confirm by clicking OK.
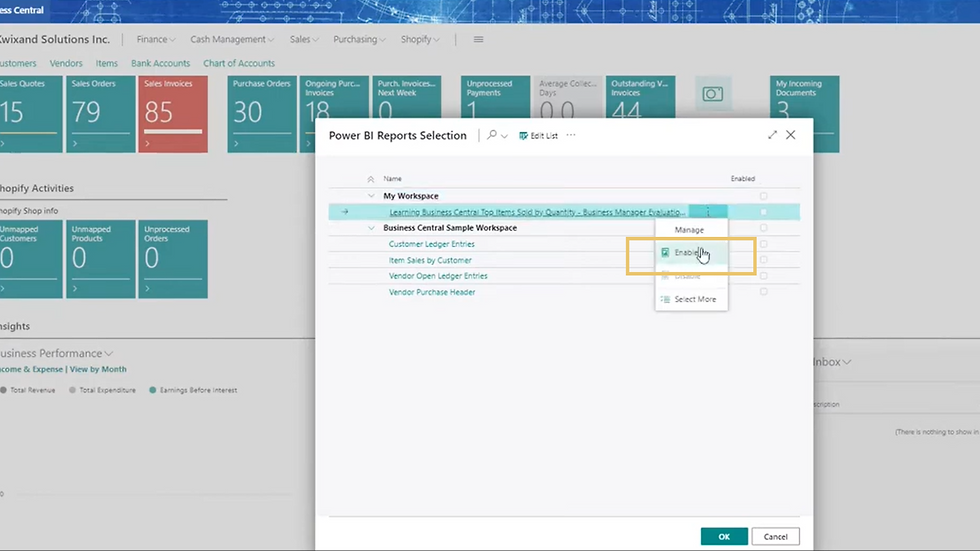
Your selected Power BI report will now appear directly in your Role Center homepage, offering a real-time view of key business metrics. You can scroll through multiple reports if more than one is available.

Display Power BI Reports on Specific Pages
You can also display Power BI reports on individual pages within Business Central, such as customer lists, vendor lists, sales orders, and purchase orders. In this example, we’ll show you how to display a Power BI report on the customer list page.
Navigate to Customers under the Sales section in Business Central to open the customer list page.

The Power BI report pane may not be visible by default. To make it visible, from the menu at the top of the page, click on Actions > Display > Show/Hide Power BI Reports.
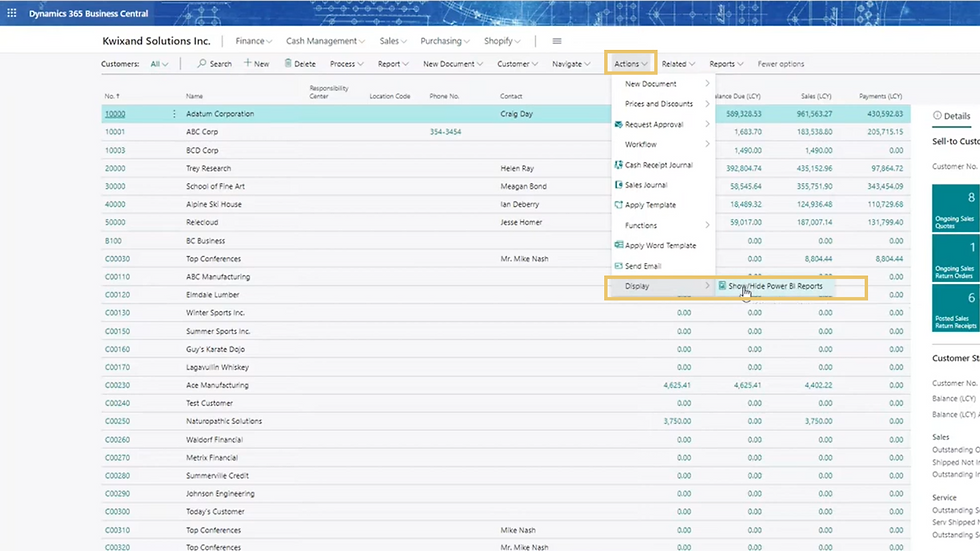
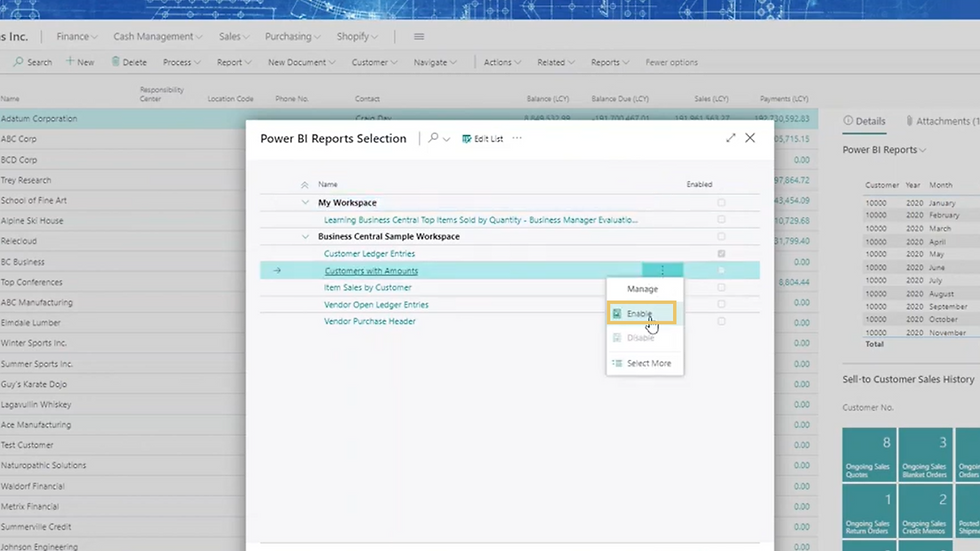
Now that the Power BI report pane is visible, you can select the report you wish to display here such as a Customer Ledge Entry report, for example. Click on Select Report.

Click on the ellipsis next to the report, select Enable, and click OK.

Your selected report will now load in the pane.

In this example, the report we selected is a simple list that shows customers and the amount of their ledger entries group year month. The report will dynamically update based on the customer selected in the list. For example, the ledger entries will change to reflect data for the currently selected customer. This is a useful feature of Power BI where you can include a filter so that when you change the customer or the related entity, the report will update dynamically.
Add a New Power BI Report to Business Central
Here are the steps to adding a new Power BI report and making it available in Business Central. After you’ve launched the Power BI application, choose a data source by clicking Get Data > More.

You have the option to choose various Business Central connectors but for more flexibility, select an OData Feed by typing it in the search bar. This relies on published web services within Business Central which may be standard or custom built and will give you a lot more flexibility when choosing data.

In order to use the OData Feed, return to Business Central and open the Web Services page by typing it in the search field and then click on Web Services.

Once the web services page loads, you can do a filter and look for Power BI reports specifically. Select the one you want to use by copying the OData URL.

Return to Power BI and select the OData field by clicking Connect.

Paste the OData URL in the URL field and click OK.

Your Business Central Data will be loaded into the Power BI window. You can choose to transform the data before if required by selecting Transform Data. If not, click Load to import the data as-is.


Once the data is loaded, you’re ready to build your report. Adjust the canvas size in Power BI for optimal display in Business Central by navigating to the Format settings. Go to Canvas Settings, select Custom size from the drop-down menu and input 325 x 350 in the height and width fields.
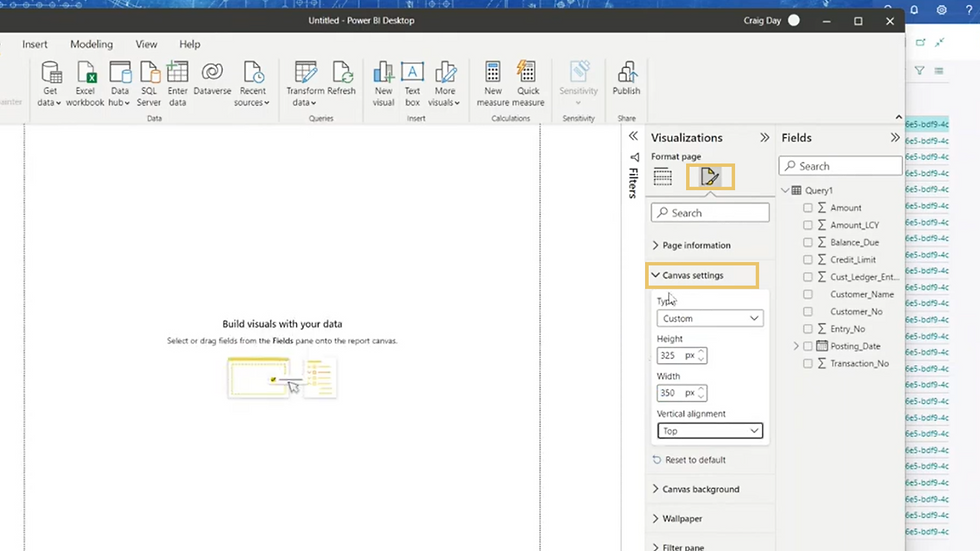
To build your report, drag and drop fields from the loaded data pane onto the report canvas and adjust the width of the columns as needed to fit your report properly.

For this example, we’re building a customer list report. To enable dynamic filtering by customer, we drag the Customer Number field into the Filters on All Pages box. That way the report will update dynamically when we select a different customer from the list.

To save the report, go to File > Save As, and name your report.


Publish the Report to a Power BI Workspace by going to File > Publish > Publish to Power BI.

Select the workspace and click Select.

Once the publishing process is complete, close the pop-up window by clicking Got It and return to Business Central to view the report.
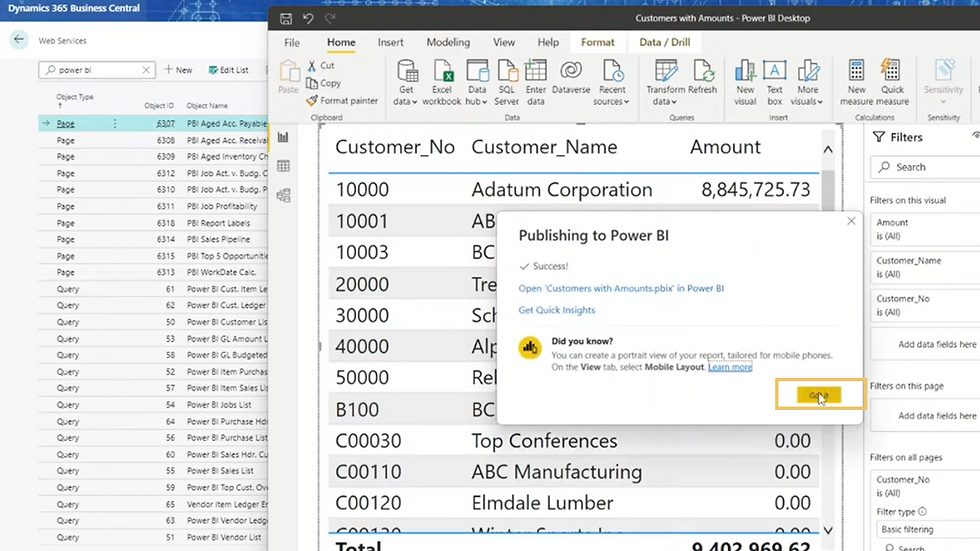
Head to the page you’d like to display the new Power BI report in and select the Power BI Report Pane and click Select Report.

From the available list, select your newly published report. Click the ellipsis next to the report and select Enable
The newly created and published Power BI report will now appear in Business Central.

Watch the Training Video: How to Integrate Power BI Reports in D365 Business Central
Having trouble integrating your Power BI reports in Dynamics 365 Business Central?
Feel free to get in touch with the team at Kwixand Solutions for expert assistance. Don't forget to subscribe to our YouTube channel for more Business Central training videos, and stay connected with us on LinkedIn, Facebook, and Instagram for the latest updates.
